I loved this sketch from Nuts About Sketches Blog and couldn't resist creating a layout or two to share with you. Both of these layouts were inspired by Fall and Sketch #289. Hope you like them!
Here is layout #1 - my great niece having a few Fall photos taken!
And my daughter and our puppy at the local park!
Background
Sunday, November 3, 2013
Saturday, October 5, 2013
Happy World Card Making Day - Challenges and Prizes!
At CUC this weekend, we are celebrating WCMD with some amazing challenges and a beautiful prize! I am so excited and can't wait to play along. So I posted a cute little challenge in honor of Fall Harvest.
Now I don't make a lot of cards but when I saw this set of stamps from Dear Lizzy, I knew that I had to use it! So the challenge I posted is an embellishment challenge. In honor of fall harvest and all the amazing canning taking place, I challenge you to use a canning jar on your card. It can be a die cut, stamped image, printable, etc. like I did here!
For the card on the left, I simply stamped the jar and filled with love.
On the second card (right), I actually stamped the image, and then made a clear 2 layered pocket on the back of the jar and filled with punches to give a "shaker" effect.
Come play along with our awesome inspiration! And now for our AMAZING PRIZE - yep I know that you have been waiting for this!
Now how can you resist that???? Come Play!!!
Monday, September 2, 2013
Back to School - All month at CUC!
Join us all month long as we celebrate the children going Back to School, the clothes shopping, the school supply lists, the classes and even the lunch menus!! Everything related
to going "Back to School". Each day here at Cookin' up Creations the
Challenge Team will post a challenge for you, based on the Back to
School theme. So make sure you check out what the Team has in store for
you this month!
Monday, July 22, 2013
Another Collection of Silohuette Cameo Freebies - Nautical and Beachy
Now again, this is just a collection. I didn't create any of these but found that putting them in one area by theme was helpful. So here are a few. Go to Cookin' up Creations for the full collection and download links!
Enjoy!
Enjoy!
Thursday, July 18, 2013
Eye Candy - Tutorial
I love all the new shiny bits and baubles that many of the scrapbooking companies have come out with lately and I new as soon as I saw them that I had to try to make my own. I tried label paper with glossy accents, inking them, chalking them, pearling them, alcohol inking them, hot glue dots (which I had a hard time making a actual bauble), and more. Each time the product wasn't quite what I was looking for. Just using glossy accents left flimsy pieces that seemed to bend and stick to itself too much. So this time I tried something a bit different.
First, I used Aleene's Tack it Over & Over glue (you remember - the stuff I use to make my own pop dots?) and placed small dots on the backside of a vinyl sheet that was used up.
I gave it a moment to dry. Meanwhile, I punched lots and lots of circles with a regular circle hole punch. I love this because I used up so many little scraps! Then I stuck each dot on the glue and covered a bit with glossy accents. Don't be shy here. It will shrink a little when it is done and you want a bauble not a shiny dot! Although you can go over with a second coating of glossy accents. Let dry and VOILA! The dots come off easy due to the tack-it and stick to any project. Best yet, I can make them in any color, number, etc. Here is a picture of the dots that I made. Looks like that dot candy from when you were a kid right??
Tuesday, July 9, 2013
Arrows and Chevron Silohuette Freebies!
Who doesn't love arrows and chevrons and of course FREEBIES! I just linked a ton of freebies that I have collected at CUC! Check out the link!
Here are a few teasers!
So check it out! Right now! Sorry couldn't resist! Become a member and also check out other collections! Next time? Thought bubbles!!
Here are a few teasers!
So check it out! Right now! Sorry couldn't resist! Become a member and also check out other collections! Next time? Thought bubbles!!
Monday, July 8, 2013
CUC and some AMAZING sketches from Liz Chedester!
If you haven't had a chance to check out this month's challenges at CUC, then you are truly missing out! Liz Chedester shared a month's work of sketches with us (one for each Blue Plate Special Day) and we have created some amazing inspiration for you! You must check these out! Here is a link to the first week of sketches on the CUC Blog. I created the first layout for this month so here is a tidbit of what you will find:
The first sketch from Liz:
And here is the layout that I created of my daughter and friends performing at the spaghetti dinner challenging followers to use a watercolor marker and spritzer technique:
I hope we can fill your inspiration board this week! Come join us for family and fun too and even get some scrappin done! Don't forget to stop by our amazing gallery for some inspiration and leave a little love too!
Saturday, June 8, 2013
Show and Tell Saturday - CUC Turns Four
Hello everyone! I wanted to share with you an AWESOME SITE! I know that I have posted about this site before but this month is particularly special. Cookin' Up Creations is turning FOUR!!!
All month long we are planning and sharing amazing challenges, games, inspiration, way cool prizes, and much more - friendship! I have been a member of this site for a few years now and love the relationships formed here. Come join us for sketch challenges, birthday celebration challenges, unique gift ideas, birthday games like Pin the Tail on the Donkey, and more. We would love to have you! Don't forget to browse the gallery!
All month long we are planning and sharing amazing challenges, games, inspiration, way cool prizes, and much more - friendship! I have been a member of this site for a few years now and love the relationships formed here. Come join us for sketch challenges, birthday celebration challenges, unique gift ideas, birthday games like Pin the Tail on the Donkey, and more. We would love to have you! Don't forget to browse the gallery!
Sunday, May 26, 2013
Show and Tell Saturday (kinda) - My favorite Cut Files
Okay, so I know that it is Sunday - sorry graduation parties are keeping me busy - but I wanted to share a few of my favorite Silohuette Files. I received a Silohuette for Christmas and have been hoarding files ever since. I'm kind of a hoarder - Ahem . . . here they are!
1. I love this cut file from Ashley at the Paper Bakery. This file would be awesome between picts of my two kids!!!
2. I love these gears for boy themed layouts from KLDezign:
3. Perfect for Project Life or any layout - Also from KLDezign:
4. I love this star and circle border from Chic Tags:
5. Also from Chic Tags:
6. And even though you have to pay for these from Two Peas:
Just thought that I'd share! ;) Enjoy!
Saturday, May 11, 2013
Summer Scrappy Goals - Show and Tell Saturday
One of the things that I love about teaching is the summer. No, I don't get the summer off with classes, planning, redoing curriculum, learning new techniques, etc, but I do get some time to work on projects that I can't get done in the regular school year. Most of the time my evenings are spent cooking, cleaning, grading papers, making seating arrangements, or falling asleep on the couch! So I thought that I would share a few scrappy/altered ideas that I want to do this summer!
1. I love anything that displays photos so when I saw this wreath from Try It Do It, I knew I must try it. I have tons of old photos that have been passed along to me and my plan is to make copies and display. My family would love to see my Great Grandmother, her great grandparents, etc!
2. I want to make this perpetual journal from Meredith Winston for next year - and maybe even do one to finish this year. I then can record awesome memories all year long - and as my kids have my sense of humor, it is always interesting to hear the stuff that comes out of their mouth!
3. I must decorate my hallway going up the stairs like they did here. I painted last year and hope to decorate this year. I love the extra embellishments here and would love to add some vinyl quotes as well!
4. And who could resist this display by weddingbycolor.com? These would be so cute on the mantel up the stairs!
5. And finally, I am absolutely in LOVE <3 a="" album="" camera="" from="" href="http://bobunny.blogspot.com" mini="" shaped="" target="_blank" this="" with="">Bo Bunny
So those are my summer goals for this year. I would add more but this is also my home improvement time and I have tons to do! Hope you can take some inspiration from this post and use it in your home! I will post my progress as the summer begins - OFFICIALLY JUNE 10th at 2:30 pm but who's counting???? :)
Sunday, May 5, 2013
Re-using Sketches????
There are so many amazing sketches out there to inspire and challenge us on a daily basis but I began thinking . . . (yep dangerous) . . . and sometimes I come across a sketch that I want to use more than once. My worry is that my pages may start to look the same so I try to mix it up a bit and use older picts on one and newer on the re-used sketch layout so they won't be so close together in my albums.
That definitely works but this time around I wanted to use the same sketch in the same album (livin' on the edge!) So I thought that I might try to angle the sketch so it won't be so obvious!
I re-used this sketch from Sketches with a Twist - and changed up the angle and embellishments.
Here is the first layout:
and the second angled layout!
So that's it! Re-using favorite sketches with a slight twist! Try it out!
Saturday, April 27, 2013
Sketch Mania! Show 'n Tell Saturday!
Now you all know that I love sketches! Every layout that I create (ok maybe not EVERY layout but most) starts with a sketch of some sort. Here are a few of my favorites lately!
This first sketch comes from Ideas for Scrapbookers and I knew that I wouldn't be able to resist try it out since it was so unique!
And here is a layout of my son and some friends on Superhero Day. Please excuse the dorky costumes!!!
And this sketch come from Nuts about Sketches. I chose to only do the left side but I loved the way it turned out!
This next sketch also comes from the same site!
And finally, one last sketch from Sketchabilities.
Sunday, April 21, 2013
Washi Tape Buttons
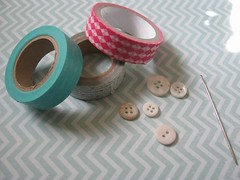
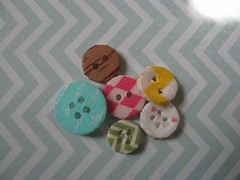
Good Sunday Morning everyone! I just thought that I would pop by and share a quick little tutorial that I did this morning. In my surfing on Pinterest (Yes I know it is addicting) I found this cute little tutorial on Washi tape covered tacks and thought - hmmmmm . . . buttons? brads? So I thought that I would give it a little try. Here is what I came up with:
1. Gather supplies - Unwanted buttons - My father picks up tons of buttons at garage sales for me and so I have a tons of those not-so-appealing white ones, washi tape, a darning needle or piercer, and maybe an exacto knife.
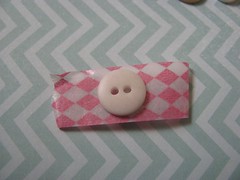
2. Lay your button on the washi tape tape sticky side up and trim around the edge.
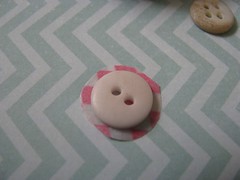
3. Begin folding up the edges and run your nail along the edge to secure.
4. Finally put the large end of your needle or piercer through the holes and wiggle a bit til you get the desired effect.
5. Now I like the rough edges at times but sometimes I like a cleaner edge so on the green and teal buttons, I trimmed around the edge with an exacto knife!
Here is a layout that I created using teal buttons with a rough edge. My daughter loved the One Direction store at the MOA!
Extend that washi tape and try these out!
Subscribe to:
Comments (Atom)


